
Let me start with my disclaimer - I am not a pro-photographer. In all honesty I am a momtographer - a mommy with a dslr who is passionate about capturing moments of my children's childhood. Everything I know is self taught. A lot of what I have learned is intuitive and trial and error. I was asked yesterday by three different people how to take pictures of their Christmas tree. I am going to attempt to answer how I did it in as simplistic of terms as I can. I am sure there are far better tutorials out there, and definitely far more technical tutorials to be found. But here is what I do.
The camera I use is a Nikon D5000, and my current favorite lens (which has not left Roxy, my camera, since the day I purchased it!) is a Nikkor 35 mm. LOVE this lens. Love, love, love it.
Moving on.
So your lighted Christmas tree photos might be turning out like this....
The camera I use is a Nikon D5000, and my current favorite lens (which has not left Roxy, my camera, since the day I purchased it!) is a Nikkor 35 mm. LOVE this lens. Love, love, love it.
Moving on.
So your lighted Christmas tree photos might be turning out like this....
(no sparkly glow - the flash sucked it all away {sad})
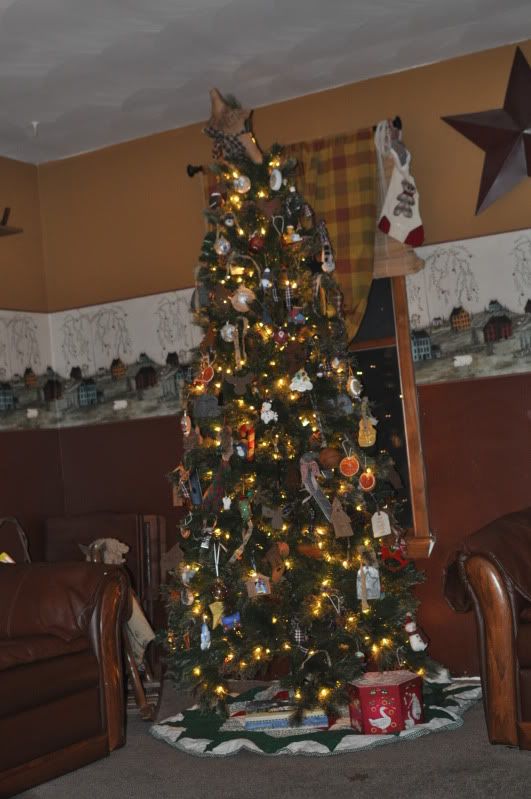
when what you are really wanting is a photo more like this.

The first photo was taken in auto mode on my camera with the flash.
Here is how I got the bottom photo:
Tip #1 Light your Christmas tree. Turn off all of the other lights in your room. I took this photo around 8ish, so it was completely dark out at this time.
Tip #2 Use a tripod or something to set your camera on. (You will want to do this anytime you begin slowing your shutter speed -which means your shutter will stay open longer in order to let in more light - and it is really hard to hold still enough to not shake your camera and blur your photo.) Jim has a really nice tripod, but I was feeling lazy, so I just propped my camera on some crates that I had.
Tip #3 Turn your camera to manual mode. This automatically turns off my flash on my camera. You want your flash off.
Tip #4 Change your ISO (for my camera I go to the menu to change ISOs). My room was dark except for the tree, so I changed my ISO to 3200 (as high as my camera will allow). You may want to play around with this for your camera and depending on what time of day it is.
Tip #5 Because I only had light from the tree in the room I wanted my lens open as wide as it could go in order to suck as much light in as I could. So this meant that I wanted to change my f stop (aperture) to the SMALLEST number. For my lens that is 1.8.
Tip #6 The last thing I did was change my shutter speed to 1/60 for this shot (I metered on my Christmas lights - if that does not make sense to you just keep adjusting your shutter speed and snapping until you like the look!).
Tip #7 Focus and shoot!
Let me know if you give it a try, if it helps, or if you have better/different tips to share!
(All photos are unedited - straight out of the camera)

 Subscribe in a reader


 Addis Ababa Time